
Hi, everyone. It’s Joaquin, Vaquform’s newest designer.
Now before anything, if you’re looking for tips on DIY packaging, how to create blister packaging, or simply interested in hearing a newbie’s journey from packaging design to mass production with vacuum forming, then you've struck gold my friend!
I was hired two months fresh out of design school and since joining the team, I've been fortunate to have already handled a project all on my own already from start to finish. Which is exactly why I’m here! I thought it would be helpful to share with you guys what I learned from my very first vaquforming project.
The brief was pretty simple – create blister packaging for a small figurine.
To be more specific, I was tasked to design blister packaging for a custom mickey mouse figurine, the designer of which we closely worked with.
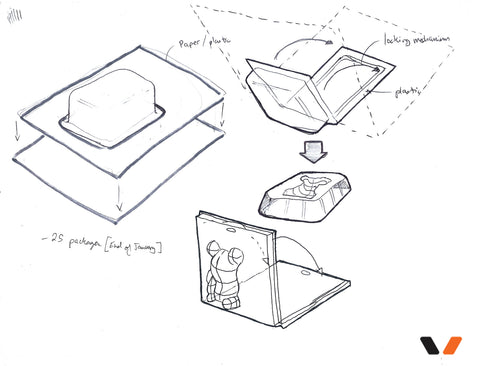
I came into the first meeting with a concept ready — a three layer packaging system easy enough to both form and assemble, and mass produce it. (it's a good thing I've got both a 3D Printer, and Vaquform’s DT2)

After that initial meeting, I then went on to further refine the sketches I made so I could officially start with the actual implementation process.
First Step: CAD MODEL

It wasn't my first time 3D modeling with 3D printing restrictions in mind. However, this was my first time doing it specifically with Vaquforming as my end goal.
For this, I'll let you in on one thing I was told anyone doing Vaquforming should know: “Draft angle is dogma.” It’s one of the very first things I learned from our big boss, John - the father of this amazing machine.
Just a refresher for newbies out there like me: a draft angle is the slant applied to every side of a workpiece that touches a mold or a form.

They are typically used in designing with injection molding in mind; to ensure that the form will release easily from the mold.
So with that quote heavily in mind, I made sure to place draft angles on every surface that would touch the forming sheet to ensure the 3D print would easily come off once formed. In my design’s case, I found 3 degrees worked best.
Second Step: 3D Printing
Many more lessons specific to 3D printing were learned during this stage.
For instance, one special consideration for 3D printing specifically for Vaquforming, is to consider surface quality. Not only will a best quality print surface lessen post-processing work, it will also make it easier to drill vent holes for the forming process.
Just a refresher: A vent hole is a small hole you drill into a workpiece to allow air to pass through the form, allowing the forming sheet to form into the large cavities of the workpiece. Without vent holes, air would likely get trapped in those cavities, preventing the forming sheet to fully cover the entire surface area of the workpiece.

How to do it? Well, the conventional drilling technique works, but if you want the best possible surface quality, best to employ the peck drilling technique.

When you're about to print your first official prototype, make sure to optimize your slicer settings to get the smoothest possible surface finish for the 3D printed mold. Because of how powerful the DT2 is, any surface imperfection will show on the final form.
As for the infill, choose a specific one that would allow air to freely pass through the top of the workpiece down to the vacuum. The idea is that you only have to drill through the outer shell or layer and not the entire print in order to create vent holes for the form.
The slicer software I used was Ultimaker Cura 4.8.0. Here were my settings for my print.
- Quality
- Layer Height: 0.2mm
- Line Width:0.4mm
- Shell
- Wall Thickness: 2mm
- Wall Line Count: 5
- Top thickness: 1mm
- Layers: 10
- Bottom Thickness: N/A
- Layers: 0
- Optimize Wall Printing Order: On
- Infill
- Infill Density: 40%
- Infill Pattern: Gyroid
- Connect Infill Lines: On
- Material
- Printing Temperature: 200 Celcius
- Build Plate Temperature: 60 Celcius
- Initial Layer flow: 120 %
- Speed
- Print Speed: 60mm/s
- Travel
- Enable Retraction: On
- Combing mode: On
- Build Plate Adhesion
- Build Plate Adhesion Type: Raft
Keep an eye out! We’ll be getting into more detail about 3D printing for Vaquforming in a future article!
What about just removing the infill completely? Well, I learned the hard way that you really can’t just print hollow molds in an attempt to save material and time. The heat of the plastic sheet will soften the 3D printed plastic mold and cause it to collapse during forming. So depending on the size of your work piece, probably best to just leave the infill in.

Third Step: Refining 3D Prints
As mentioned previously, any surface imperfection will show on the final form because of the power of the DT2 Vacuum. So to smoothen the surface, I used the ever-reliable wall putty.
Being hands on with wet fingers instead of using tools to apply it helped save time. You may also use a small fan to speed up the drying process. Just be careful about caking on too many layers at a time. The surface of the putty tends to crack due to the temperature difference between layers.
If you need to put a lot of it on a certain area, do so in thin layers and allow them to dry first before applying the next layer.
Fourth Step: Testing the Form
Now, the moment of truth. Having realized how much of a learning experience it has been so far made my first time Vaquforming both exciting and dreadful.
I set the vaquform, waited for the plastic to heat and when the vacuum automatically turned on, lowered the handle bar. Seeing the finished form, I quickly discovered a new element to consider when creating 3D models for Vaquforming - Webbing.
On some parts of the workpiece, instead of the plastic sheet collapsing into the form, a web would form. I quickly realized that this was due to the cavities in the workpiece whose edges were too close together. . There wasn't enough space to allow the plastic to stretch and form through the cavity.


Be sure to watch out for these potential “webbing zones” on the work piece. Avoid having sharp edges with deep cavities in between them so that you can ensure that the plastic is able to freely blanket the entire work piece.
Fifth Step: Cutting and Assembling the Prototype
This part for me was easy enough because the vision from the very beginning was clear. Here, I simply took note of the fitting imperfections and made the necessary adjustments.
Take 2.0: Adjusting the 3D Model
At this point, I already had a clearer grasp of how else I can improve the model I had printed earlier.
I edited the 3D model for less chances of pinching; reducing the model into only what had to be there to perform the primary function, which was to simply hold the figure in place.
As they say, less is more.
Take 2.1: 3D printing new molds, refining, testing for
When it came to testing the forms again, they were finally successful. I used two plastic sheets here to create the prototype but in hindsight, one would have sufficed had I been more conservative in my approach to making test forms. It’s one thing to look out for, in order to reduce your total material consumption in the future.
TAKE 2.2: Cutting and assembling prototype
During this stage, I received a physical prototype of the toy figurine, which ended up fitting quite well to my relief.
A shake test also proved it secure enough to hold the figure in place.
Needless to say, the toy designer was really happy with the prototype.
Silicone Molding
Now that the prototype had been approved, it was time to begin mass production.
For this particular project, I needed to create resin casts of the molds I would use to form the packaging as 3D printed molds are not heat resistant enough to withstand multiple forming cycles.

The idea of a silicone mold is quite simple - you have your workpiece which you place in a small container, pour in liquid silicone pre-mixed with hardener, and after it dries, you have a cavity of an exact copy of the workpiece. But as with most things, it’s only easier said than done.
Before anything, it's useful to cover the workpiece with mold wax release to make sure it can be pulled out of the hardened silicone. Make sure to put a thin layer only as caked layers might affect the surface quality and show up in the negative mold.
To start, prepare the appropriate amount of silicone you will use for the mold. Make sure you measure the exact amount! My first few tries were failures because I didn’t properly measure how much silicone I needed to use.
Next lesson, RATIOS! The more exact you are with the ratio of liquid silicone to hardener, the better. Follow exactly the ratio that is indicated by whatever brand of silicone you're using. Why? Too much hardener and the mixture will harden too quickly or unevenly, which will leave many air pockets and other imperfections. Too little and the silicone won't harden, or worse, only harden in a few areas.
Once you've gotten the ratio just right, MIX WELL! It's all well and good having the right ratio, but if you don’t make sure the hardener is thoroughly mixed, you'll get a monstrosity of a mold where some parts are perfectly hardened, and some parts, still liquid.
The point is to get as accurate a mold as possible for when you resin cast later on. Here’s a hack I learned from a fellow teammate: apply a thin layer of silicone and let it dry before filling the rest of the mold up in order to make sure that there are no air bubbles. And if you have some (or a lot…) of failed molds like I did, you can actually cut those up and use those chunks to fill up the spaces of your new mold as a way to save silicone.
Remember that the first phase of the mold-cast process is CRUCIAL. If your silicone mold isn't well near perfect, the resin casts will be very difficult to work with, especially for the purpose of vaquforming.
Resin casting
Similar lessons learned from silicone molding can be applied here. A thorough mixture, for one, is extremely important. As for precision in measurement, it’s not as strict but still, be careful about the hardener.
Too much hardener will cause too quick a reaction which will cause the resin to heat up more than needed and it will boil; leaving air bubbles on both the cast’s surface and its inside. Too little, and again the cast won't harden properly or at all.
It helps to put a little powder on the surface of the silicone mold to remove any potential surface tension and eliminate the problem of microbubbles. Before pouring the resin, I used climbing or weight-lifting chalk (magnesium carbonate), but something like baby powder would also do just fine.


Production capacity computation
For this part, I made sure to cast more molds than I thought I needed to make sure that I had enough to work with when it came down to maximizing the surface area of the DT2 - a.k.a. how many parts of the packaging could I form in a single cycle.
It’s always a good idea to be as conservative as you can with the material to be able to maximize its use. I made the effort to experiment with different positions within the forming area to see how many molds could fit in a sheet.
After coming up with the maximum capacity, I computed the potential number of packaging sets I could make, and then offset a certain amount in case of failed forms. In the end, quality control must prevail.
Actual mass production
Forming everything took only a few hours thanks to the DT2!.
Something I discovered was that I could use the previous form to help reposition the molds on the bed for the next forming cycle!


After forming everything, the last step was cutting and assembly. When it comes to this part, the best approach is whatever works best for you. But the approach I used for cutting and assembling everything, I based on a well known concept borrowed from economies of scale. Doing a lot of one process at a time was way more time efficient than cutting and assembling 1 entire set at a time.

My approach was roughly to cut each packaging layer in individual steps before assembling everything. How segregated you want your individual steps to be is entirely up to you!
Once you get a good rhythm going, it won't be long before you get…
The finished product!


In total, I was able to produce 30 pieces of this packaging for the figurines with only a couple of failed forms.
If there was anything particularly challenging in this entire process, it was learning everything as I went along. Diving in the deep end and making all the necessary mistakes I had to make in order to learn.
Now, creating something is hard enough already, but documenting every step of the way made it that more challenging. BUT! In the end, documenting everything really helped make sure that I could retain as much of the lessons I learned as I could.
It was easier to spot errors that way and what else I could improve one. It’s not only great for sharing tips on the internet (like how i’m doing now). I think it will prove to be very useful for myself, as I work to finetune my skills and become better at Vaquforming.
If there’s one final lesson I could offer, it’s that preparation is everything in Vaquforming. All those processes I had to go through–the 3D printing, mold making, resin casting, etc.,—they were all so I could execute that one moment—the lowering of DT2’s handlebar—and come up with one fine print.
It’s really 90% preparation and 10% execution.
Without doubt, I know many of you in the Vaquform community are far more experienced than I currently am, so I'm sure I speak for all newbies here when I say we would all truly appreciate any tips, tricks, and words of wisdom you have to share.
That’s it!! I hope my experience was helpful for my fellow newbies out there! I had a lot of fun making this and I cannot wait till my next project.
Until the next.
The Toy designer, who goes by the name "Wuji Zun", started as a Gundam scale modeler in 2010 and has since moved on to customize Funko Pops. Wuji Zun reached out to us here at Vaquform to help develop and produce blister packaging for his newest project (soon to be revealed)!Catch the unveiling of his latest project through his Facebook, Instagram, and Youtube accounts:
FB - fb.com/wujirzun
IG - @wujitoys
YT - Wuji Zun


